Wednesday, April 30, 2008

It's time to play ball!!

I love teaching through play. I believe it's the most effective way to teach toddlers and preschoolers!

For today's game, I grabbed my bag of 100 colored balls, emptied 6 containers in different sizes and taped a piece of colored construction paper on the front of each one.


To begin, I called out the name of one child and instructed him/her as to how many balls and in what color I wanted him/her to collect.

"Max, please collect 5 orange balls."


Next, the children were told to drop the balls in the correct bucket.

As they dropped their balls they were asked,

"How many balls are you putting into the bucket?"

"What color are they?"


After children had the hang of that part of the game, I started asking them to collect different balls in different numbers.

For instance, "Max, please collect 3 orange balls along with 2 pink balls."

Once he collected the appropriate balls, I asked him,
"How many balls do you have all together?"

The children would then have to divide their colored balls and place them in the appropriate spot.


When the games were over, each child was given a bucket to collect and was responsible for putting them away.

It's a fun way to teach colors, addition and sorting skills!

Tuesday, April 29, 2008

Do you love me????


Lunch time will always bring out the best conversation between preschoolers.

Typically it's the "My mom said this..." or "My dad did that..." kids comparing stories and bringing plenty of imagination into the details.

Today one of my preschool girls decided it would be fun to follow one of the boys around the dining room before lunch. Every place he moved, she moved next to him.

Just when he had had enough he said, "Melissa...XXX won't stop following me!"

I said, "That's because she likes you!"

He sat down at what we call the little table, she sat across from him and he stated in a firm voice, "DO YOU LOVE ME???"

The little girl nodded her head yes.

The more than frustrated boy shook his hands out in front of him and stated, "Then STOP following me!!!"

Friday, April 25, 2008

Number book!

A spin off from the book of colors is our book of numbers!
I was given this idea from a friend of mine who got it from her daughter's preschool teacher.
It's an incredibly easy way to help children learn how to recognize and write their numbers.


Each page has a new number (1-10) along with an easy to remember poem about how to write the number.
For example the number 2 poem is,
"Around and back on the railroad track! Two! Two! Two! Two!"

Each child is given a number worksheet to work on while we learn how to write each number.

To continue this game into free play, I asked the children to bring me 4 of any particular toy.

Thursday, April 24, 2008

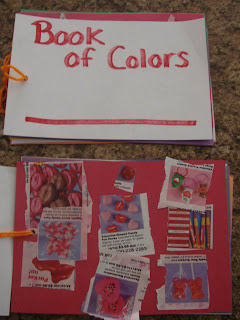
Book of Colors!

I'm always looking for inventive ways to teach, so today I decided to make color books for the kids!
The kids love books so I knew this would be a hit!
Today's color was red.
To begin I pulled out an old Valentine's Day catalog with plenty of red items and cut a piece of red contruction paper in half.

I gave each child a pair of scissors and asked them to cut out all the red items.
Note: Before giving the children scissors, I restated the rules that goes along with being "big" enough to use them.

The kids loved being able to cut out the pictures they were going to use in their very own book!

Once the kids cut out all the images they could fit on a sheet, we began to glue.

Once we were finished, I bound their book.
Once the books were complete, we continued our red "game" during clean up time. I asked the kids to find all the red toys and assigned a special spot for them. Not only did the play area get cleaned up in record time, the kids loved finding and showing me all the red toys they had found!
Each of them were eager to get started on tomorrow's color!

Tuesday, April 22, 2008

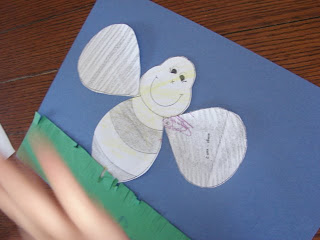
"B" is for Bee

The letter of the day is "B".
I chose this project because we've noticed more bees buzzing around during our outdoor time.
We began with a bee and sunflower coloring page.

While coloring I asked questions such as,
"Bubble bee starts with?"
"B sounds like?"
"Where do bees get their food?"
"What color is your bee?"
"What do we do when we see a bee?"
"What does a bee sound like?"

Once colored we added the bees to the environment that was made earlier in the day.
We add the wings, nose and a flower.

Once complete, the kids took their bees out for a buzz around the room.

Great Snack Idea!

Here's a wonderful snack I found at All Recipes that kids won't refuse!

Ingredients:

8 oz. sour cream1 (8 oz) container frozen whipped topping, thawed
1 (5oz) package instant vanilla pudding mix
2 cups milk1 (16 oz) package vanilla wafer cookies
4 banana, peeled and sliced

In large bowl combine sour cream, whipped topping, pudding mix and milk.

Stir well.

In the bottom of a trifle bowl or other glass serving dish, put a layer of cookies, then a layer of pudding mixture, then a layer of bananas, repeat layers until bowl is full.

Refrigerate until serving.

Monday, April 21, 2008

Alphabet Matching with a Twist!

Here's a fun and easy way to help children learn and recognize the letters of the alphabet!

To complete this project you'll need a bag of wooden clothespins, a permanent marker and flashcards.

To begin I wrote a capital and lower case letter on each clothespin.

I placed the clothespins in a bowl,

and scattered the alphabet letters on the floor.

After each child pulled a clothespin from the bowl, they were asked to identify the letter and match it to the corresponding alphabet flashcard.

For the letters they didn't recognize, I gave hints such as,

"A is for Apple".

When the kids matched the flashcards to the pin, they attached the card and brought it to me.

Once they knew they had the correct match, they attached the card to the window curtains.

With a little help from me, the children mastered attaching the flashcards to the clothespin and then attaching it to the curtains.

At the end of the game the children had a good laugh at my "new" curtains.

They were all more than willing to help remove the letters so they could play again and again!

Friday, April 18, 2008

Let's Bowl!

Ever wonder what you can do with those empty creamer bottles?
I did too!

I do have a fun winter project for them, but now that I have 15 bottles and winter's another 7 months away....what can I do with them now?

I put my thinking cap on and came up with...bowling!

I pulled out my permanent markers and began numbering my pins 1-10.

Not only will this be a fun new game, but will also help the kids recognize their numbers.

My plan is to number the next 10 bottles I save with 11-20 for the children who already know 1-10.

Once they were numbered I added a few squiggly lines for decoration:
I decided to add some rice to the bottles for weight:

To minimize the mess of pouring rice into the bottle, I cut a hole in the bottom of a paper cup, set it on top of the creamer bottle, and poured a small amount of rice inside:


Once complete, we were ready to bowl!

Since the weather is so beautiful today, we set the game up outdoors, but easily could have played indoors as well with a lighter ball.


**Let the bowling begin!**


Each child was so happy and excited, often clapping their hands and jumping up and down when they knocked pins down!


Once they knocked 'em all down, the kids worked together to put them back up and bowled again!

Our Rockin' Birds!

Sticking with the bird and spring theme of the week we decided to make
rockin' birds today.

I first used the hot glue gun to attach a craft stick to each t.p. roll.

Once I had the stick secured, I folded a piece of saran wrap in 1/2,
placed the t.p. roll over it and dropped in a few dried beans.

A combination of glue and scotch tape was used to secure the saran wrap to each side of the t.p. roll.

The sample bird was placed in the middle of the table and each child was given a bird template to color and decorate.

We began to assemble the bird when all the pieces of the templates were cut and ready for each child.

The children's favorite part of assembling the bird was the dimensional beak.

Once our rockin' birds were dry the children enjoyed running throughout the play area whistling or at least attempting to and rockin' their bird.

Thursday, April 17, 2008

Hummingbird Art


Our hummingbird project was an easy one for all the children.


Once again starting with a recycled t.p. roll and our spring theme I thought it would be fun to teach the children a little about hummingbirds.
I gave the children the colors indicated on the sample hummingbird and directed them to try to match their bird as close to the example as possible.
During rest time, I cut and laid out the pieces of the hummingbirds, as they would be attached with glue.
During this time we discussed some of the fascinating facts about hummingbirds.
For example:
-> They have the fastest wing beats of any bird.
-> Hummingbirds may visit 1,000 flowers a day.
-> For protein, hummingbirds eat spiders and strain gnats from mid-air.
-> Hummingbirds feed through a long, tube-like tongue that darts into the flower's corolla for nectar.
-> Their tongues are shaped like a "W".
-> A hummingbird can rotate each of its wings in a circle, allowing them to be the only bird which can fly forwards, backwards, up, down, sideways or sit in sheer space.
-> To hover, hummingbirds move their wings forward and backward in a repeated figure eight, much like the arms of a swimmer treading water.
-> Hummingbirds can move instantaneously in any direction, start from its perch at full speed, and doesn't necessarily slow up to land.
-> Hummingbirds can even fly short distances upside down.
Once we finished our hummingbirds the children demonstrated how hummingbirds fly.